Trending: Natural Wood Cabinets
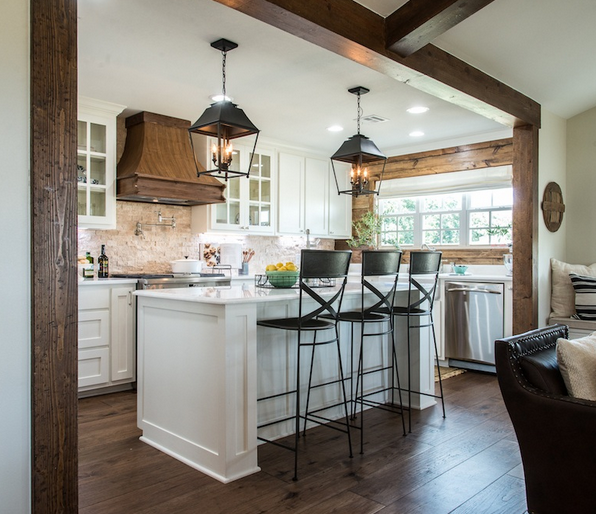
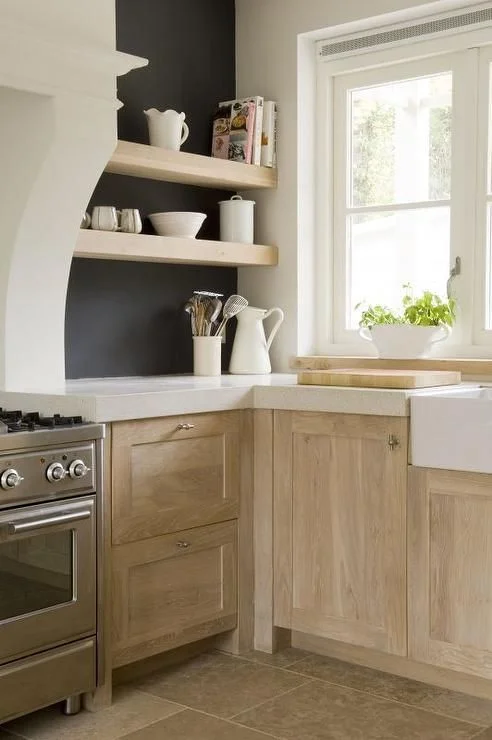
For the past few years gray, white, or two-tone cabinets have been all the rage. As we see in fashion, design styles fade for the next up and coming fad.  In this case, enter natural woodcabinets. For the most of us, when we think of natural wood finished cabinets we think of generic builders grade cabinets that have a yellowish varnish to them. However, after seeing the kitchens below you may change your perspective. 

Via

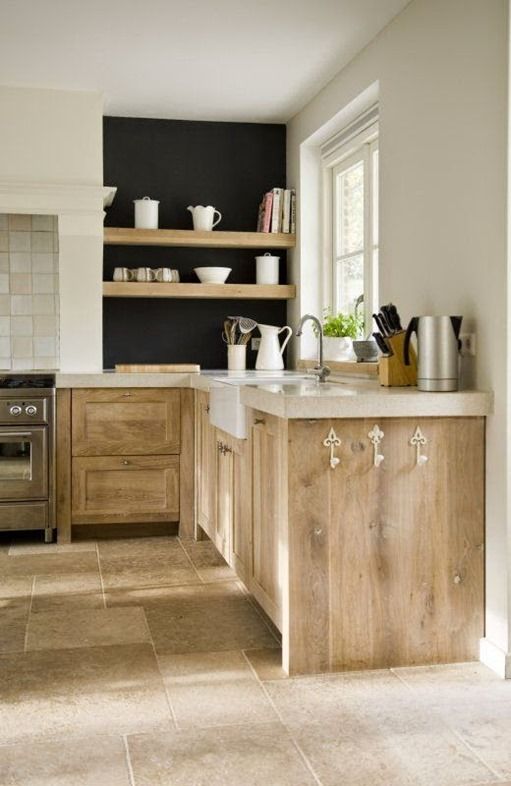
Here is another view of the same kitchen.

Via

Via

Via

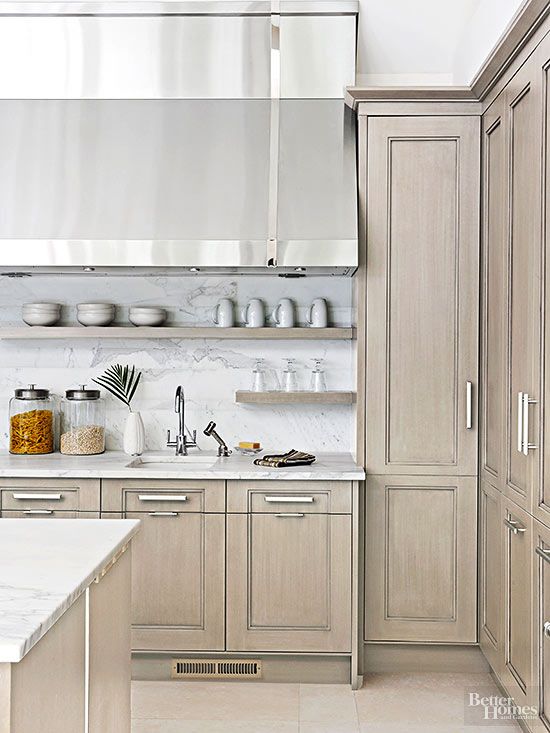
The cabinets above are made from alder wood that have a thin gray stain applied to them, which warms up the cabinets while still letting the grain show through.

Via

The cabinets featured in the modern kitchen above and in the kitchen below are made from white-oak.

Via
Via

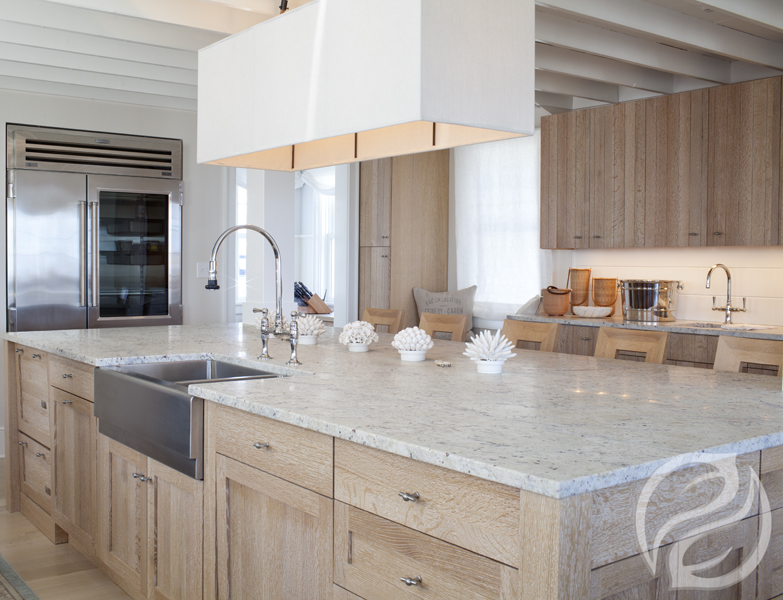
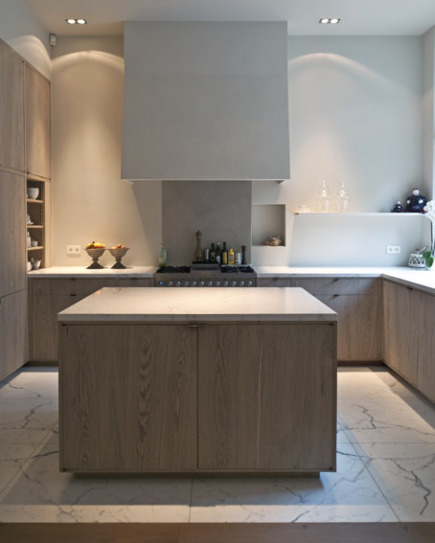
With the right stain/finish, natural cabinets can look sophisticated and add a nice warmth.  As we have seen in the images, works in all kitchen styles from traditional to modern.

Until next time!

Rollins' Floral First Birthday

My sweet Rollins turned one last October.  Now that she's 15 months old, I guess it's time I finally share some of her first birthday party details with you guys.

Like all of my parties, I like to pick a theme that isn't super commercialized so I can personalize it a little more.  Auden had a pumpkin first birthday since she was a fall baby and was often called "pumpkin."  Since Rollins is also a fall baby, I had to think of something else.  I decided a simple floral theme with watercolor touches would be just perfect for our sweet girl.

chalkboard first birthday with flower garland

I used greenery from our yard and some Dollar Tree flowers to make all of the floral swags.

One of my favorite details from the party was this floral photo wreath (idea sourced by Jessica).  I used images from her first year, converted them all to black and white and used Persnickety Prints for printing them.

They have a lot of great options, but I chose the 3" press print with thick border and matte finish.  I couldn't have been more pleased with the quality and customer service.

persnickety prints 3 inch floral photo ring

Jessica helped again by allowing me to use some jasmine from her yard to adorn the table and big balloon by Rollins' highchair.

This birthday poster I made hung above the food table, detailing her first year milestones.

first birthday poster with flowers

I kept the menu simple and fresh with cold subs, fruit, a cheese and cracker tray, pasta salad and spinach dip with pita chips.

floral first birthday food table
floral first birthday dirty iced cake

Everything is prettier with a bow, right?

styled sub sandwiches with bakers twine
cheese and cracker tray with fresh herbs

Of course, it's not a Reutter party without some custom sugar cookies.  I loved how the sweet monogram and flower details turned out.  Christa Lynn's on Etsy did a great job making my vision a reality and was very reasonably priced.

floral first birthday monogram sugar cookies
floral sugar cookie with monogram

For the main treat, my mom and I tried our hand at a dirty iced cake.  And I have to say,  I was pleasantly surprised with the outcome.  I love when family and friends can lend a hand in helping with a celebration.  It creates even more memories to cherish.  Much like my wedding (where the flowers and decor were done by me and my friends and family), this too will be a memory I'll never forget.

I ordered the light cherry wood cake topper from Alexis Mattox Designs on Etsy.  I threw on some fresh flowers, and there you have it.

dirty iced cake with flowers

Along with custom cakes and cookies, I also love a good signature cocktail.  I decided on a Rosemary Greyhound for the taste and look (I wanted it to match the decor).  But since the party was for Rollins, I added her nickname to the moniker, calling it a "Rolly Rosemary." You can get the watercolor tent labels here.

Rosemary Greyhound Recipe*

Ingredients

Rosemary Simple Syrup

  • 2 cups of water

  • 2 cups of sugar

  • 6 sprigs of rosemary

Cocktail

  • 2 ounces vodka

  • ½ ounce rosemary simple syrup

  • 4 ounces grapefruit juice

  • sprig of rosemary for garnish

Instructions

  1. Simple Syrup: In a small sauce pan over medium low heat, dissolve the sugar into the water for about 5 minutes. Do not let the mixture boil or crystals will form. In a heat safe container, pour the warm sugar water mixture over the rosemary sprigs and let it steep for at least 1 hour. The rosemary simple syrup will keep in the refrigerator in an airtight container for 10 days.

  2. Cocktail: In tall glass filled with ice combine the vodka, rosemary simple syrup and grapefruit juice. Garnish with a sprig of rosemary.

*This recipe is for a single cocktail but we just multiplied the amounts enough for our needs. 

I was so glad I finally got to use my vintage French Arcoroc champagne glasses I scored off Craigslist!

I ordered a 5" white buttercream cake from Publix for her smash cake.  Auden had one from there too, and she loved it!  I wanted to keep it simple, so I'm just added adorned it with a few flowers.  The pink glass cake stand was a TJMaxx find a few months before her party.

floral first birthday smash cake pink glass stand

Rollins in her birthday outfit.

floral first birthday wooden highchair

We don't call her sweet cheeks for nothing.

floral birthday wooden highchair

After getting into her true birthday suit, she was ready for the cake!  Her baby's breath crown didn't last long after daddy put the cake in front of her, so I'm glad I saved some money and made it myself with a little floral wire, scotch tape and babies breath clippings.

This is one of my favorite shots of my sweets enjoying her first sweets.

smash cake photography

I'd say this picture sums up how she feels about it pretty perfectly :)

smash cake photography

She delicately ate away at the icing for a good 30 minutes paying no mind while the party carried on.  :)

rollins floral first birthday

The cleanup crew was anxiously waiting for a taste themselves.

After she indulged a bit, we moved her into the living room for prime view of her one year video.

I made one for Auden and it's something we all still love watching, so I knew it was a must for Rollins as well.  Between the music and the memories, it's almost always a surefire cry session every time I watch. 

Here's the 3A Girls at the celebration...just missing Jessica's oldest.

For the favors, I created this favor sign to match her invitation. I did mini canvases, a paint brush and paint pods to carry out the watercolor theme.

mini canvas and paint party favors

We're so happy to have been given these last 15 months with Rollins and cannot wait to see her life unfold.  I could not have dreamed up a better addition to complete our little family!

signature Mallory.png

E-Design Condo Refresh

We recently completed an E-Design project for a condo refresh, and it was so fun to breathe new life into the clients' space with a few easy updates.  The most labor intensive idea was adding some grid trim work detail down the hallway.  Aside from that, all of the updates were a few new purchases and such game changers in updating the look of the condo.

The owners wanted a relaxed, transitional design and had already purchased a few new items but were lost on how to tie up all of the rooms.  They also wanted a fun idea for their existing bunk room. 

With our Get a Look Package, they were able to get a few things sourced for each room without having to do an entire E-Design for each space.  This service is great for those who have already started their projects or just want some help finding those missing pieces!

Here is what we came up with for their condo:

The living room got a new jute rug, coffee table, throw pillows and some fun black oars to hang as artwork over the long wall on which their sofa resides.

As previously mentioned, the main hallway was not forgotten! Simple grid trim work, some cool sconces and a striped runner (on sale!) completed the previously overlooked space.

All the master bedroom needed was some new bedding, lamps and accent over the dresser. The geometric pillows and simple mirror helped finish off this relaxed, contemporary space.

In the twin bedroom, we sourced new headboards, a side table, lamps and bedding and also suggested updating the room's current window treatments with these bamboo shades.

Perhaps our favorite room in the condo is this bunk room.  White built-in beds with a natural wood ladder and some playful lighting and bedding make this room quite the spot!

We loved helping this family make their home away from home somewhere they'd be proud to call their own. 

If we can help you finish off a room or two, simply fill out the survey on our E-design page. All of the information is explained there, but if you have any questions, please don't hesitate to ask!

3a blog signature


Fixer Upper Favorites- Big Country House

Like the majority of America, we are on the Fixer Upper train and love to tune in to Joanna's designs and Chip's antics.  I love to play that "if it were us, which house would you pick?" game with Jon.  Thankfully, we're usually on the same page!

This week's couple was on the same page as well and were captivated by the Big Country House (or its potential) and the beautiful land and pond that came with it.  I don't blame them.  The end result was a completely different house with some great design features... and even a few similarities to some of our previous designs. 

Let's review my favorites (all images via https://magnoliamarket.com):
 

You can't beat a large porch and MULTIPLE French doors, right?

This long hallway AND THOSE BEAMS had me hitting pause and rewind a couple of times.  Gorgeous.

I also fell in love with those bar stools--classic with a modern touch.

And those pendants reminded me of a client design we did last spring...

The dining room light looked familiar as well...but we chose ours for our clients' living room.

Speaking of the dining room... we are a big fan of those chairs and have used them in a couple of designs as well...

We're all about the functionality (and often cost savings) with a barn door but if you can add an antique door instead, do it!  Look at that patina!

The bunk room was another winner.  I don't think one can go wrong with a room full of built-in bunks, ever.  And we're always into each bunk having their own individual lights (as you'll see in a new beach house design coming up soon!).

So that's my list.  What were your favorite parts?  Can't wait for next week's transformation!

Mallory's Home Christmas Tour

Christmas time is by far my favorite time of the year.  Hands down.  There is just something so magical about the season that I think it deserves far more than a month of celebration.  The sights, the smells, the music, the jolly spirits, the Savior.  What is there not to love? 

One of my favorite sights to see is a glowing Christmas tree.  No, I take that back--a glowing anything.  How is it that Christmas lights in the darkest of places can make the space seem beautiful?  Ahhh.  But I digress. 

Each year when I get poor Jon to get down my copious amounts of Christmas totes from the attic, I start to plot my decor.  As soon as the first lid comes off, my brain gets to work.  I try to switch things up a little every year.  So when the boxes come down,  I see what I have available and the think of the look I want to go for in our home.  The color scheme I use for the tree is what sets the precedent for the theme for the whole house---and this year it was metallics, whites and blacks.  A little luxe, a little modern and as always a little vintage.  So let's begin the tour! 

Once you take a few steps into our house, this is what you see. 

There's an antique chest of drawers on the right that I topped with a mini pine tree and and a bowl of ornaments.  Next year I'll get around to making Mr. Horse a proper coordinating bow.

The silver bowl on the left was a $9 thrift store score.  I dressed it up with some vintage ornaments (also a thrift store find many years ago) and some pine cones from the neighbor's yard.  Done and done.  You'll soon see that a bowl with ornaments is my easy, go-to decor.  I love that it's simple (no one has hours to spend decorating a house with two little ones running around), yet still pretty and classic.

If you look to the left, you'll see the dining room. 

All the dining room needed was my favorite lit boxwood wreath adorned with matching black and gold ribbon and again, a bow of ornaments, moss and pine cones.  My glass Christmas trees added the perfect glitz.

The bowl of moss balls is always on the table (tip: every room in your house needs some greenery in it) but by adding the ornaments and pine cones, I put on her "winter coat."

Continuing on into the living room area, you see a gallery wall of our family photos and a long console.  All I did to add some holiday flair here was hang another wreath with matching ribbon (coordination is key) and I replaced our usual wooden box for a glittery tree.  Again, I threw some ornaments in with my moss rocks (you guys see how easy this is?) and ta da!  Because I already had mixed metals in this space (silver lamps, gold orb, brass bowl) the work was already half-down for me.  Work with what you have, not against it!

I feel one can never have too many wreaths on ribbons in front of windows so I added another on the other side of the living room.  This is my view from the kitchen sink.  Not too bad if you have to do the dishes (but thankfully, Jon takes care of those most of the time ;) )

Our last stop on the tour is Auden's room.  Simple was the fix in here as well.  I got out one of my mini "vintage" trees and let her go to town decorating it was some sweet clearance bow ornaments I scored at Target's after Christmas sale last year.  She loved getting to decorate (and redecorate) her very own tree.  A faux fur vest makes the perfect, free tree skirt.

As you can see, she's still learning about spatial distribution :)  But it makes it even cuter and very much "hers" so I'm okay with it.  She loved getting to help decorate our big tree too and kept saying "It's BEA-Uitiful!" and asking where the jingle bells were as she took off the lid to every box.  Rollins loves Christmas as well, but mostly for the reason that she gets to pull off ornament after shiny ornament and "cook" them in her pots and pans.  Thankfully, all of the glass ones were purposefully placed out of her reach.

We hope you all have a wonderful Christmas season filled with lots of love, sparkling lights and classic Santa photos :) 

Christmas Decor...for a Girl's Room

In case you missed it, yesterday, we discussed simple ways to dress up your boys' rooms for Christmas.  A few swaps in the bedding, a few adornments and, of course, the all important tree.  Today, it's time for the girls! 

Several of the main elements were used in both spaces, but we swapped the red for a muted pink and the lumberjack feel for a little whimsy by way of snowflakes and texture.  And, again, all of these items are from Target.  There are so many great deals that can really transform your child's space. I can't wait to get to work in my girls' rooms!

{click images for sourcing}

Jon has an off day before he heads out on another trip, so we're starting to deck the halls today!